이제는 공식처럼 되버린 개발자라면 설정하면 편한 Iterm2 기본 설정에 대해 모아서 정리했다.
자주 설정하다보니, 내 블로그에 모아놓으면 좋을 거 같았다.
Iterm2 설치
brew install iterm2
brew를 사용해서 설치해도 되고, 홈페이지에서 설치파일을 다운로드 받아도 된다.
https://iterm2.com/
iTerm2 - macOS Terminal Replacement
iTerm2 by George Nachman. Website by Matthew Freeman, George Nachman, and James A. Rosen. Website updated and optimized by HexBrain
iterm2.com
oh-my-zsh
맥 Catalina 버전부터 zsh 이 기본으로 선택됨에 따라 zsh plugin 을 쉽게 관리할 수 있는 oh-my-zsh 을 설치한다.
sh -c "$(curl -fsSL https://raw.github.com/robbyrussell/oh-my-zsh/master/tools/install.sh)"Cloning Oh My Zsh...
remote: Enumerating objects: 1275, done.
remote: Counting objects: 100% (1275/1275), done.
remote: Compressing objects: 100% (1230/1230), done.
remote: Total 1275 (delta 26), reused 1168 (delta 25), pack-reused 0
Receiving objects: 100% (1275/1275), 1.07 MiB | 3.93 MiB/s, done.
Resolving deltas: 100% (26/26), done.
From https://github.com/ohmyzsh/ohmyzsh
* [new branch] master -> origin/master
Branch 'master' set up to track remote branch 'master' from 'origin'.
Already on 'master'
/Users/leejungwook
Looking for an existing zsh config...
Found ~/.zshrc. Backing up to /Users/leejungwook/.zshrc.pre-oh-my-zsh
Using the Oh My Zsh template file and adding it to ~/.zshrc.
__ __
____ / /_ ____ ___ __ __ ____ _____/ /_
/ __ \/ __ \ / __ `__ \/ / / / /_ / / ___/ __ \
/ /_/ / / / / / / / / / / /_/ / / /_(__ ) / / /
\____/_/ /_/ /_/ /_/ /_/\__, / /___/____/_/ /_/
/____/ ....is now installed!
Before you scream Oh My Zsh! look over the `.zshrc` file to select plugins, themes, and options.
• Follow us on Twitter: @ohmyzsh
• Join our Discord community: Discord server
• Get stickers, t-shirts, coffee mugs and more: Planet Argon Shop
➜ ~위와 같은 설치 문구가 나오면서 설치가 완료 된다. (재설치 중이라서 로그가 다를 수 있다.)
Theme 변경
기본적으로 많이 사용하는 agnoster 테마를 사용한다. 해당 테마는 현재 branch 가 어디인지 가시적으로 보여줘서 편리하다.
ZSH_THEME 의 값을 수정해준다.
open ~/.zshrc

ZSH_THEME=”agnoster”
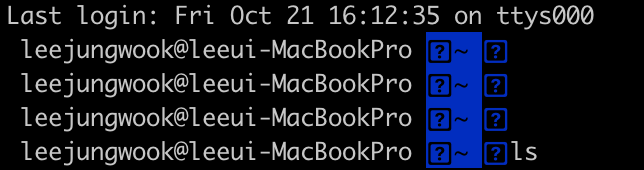
iterm2 를 재시작 하면 위처럼 글씨가 깨진다. 적정한 폰트가 없어서 발생하는 현상이므로 폰트를 변경한다.
Font 수정
https://github.com/naver/d2codingfont
GitHub - naver/d2codingfont: D2 Coding 글꼴
D2 Coding 글꼴. Contribute to naver/d2codingfont development by creating an account on GitHub.
github.com
기본적으로 정말 많이 사용하는 Naver 에서 제공하는 D2 Coding 폰트이다.
해당 주소에 접속해서 zip 파일을 다운받고 ttf 파일을 클릭, 서체 설치하면 폰트가 저장된다.
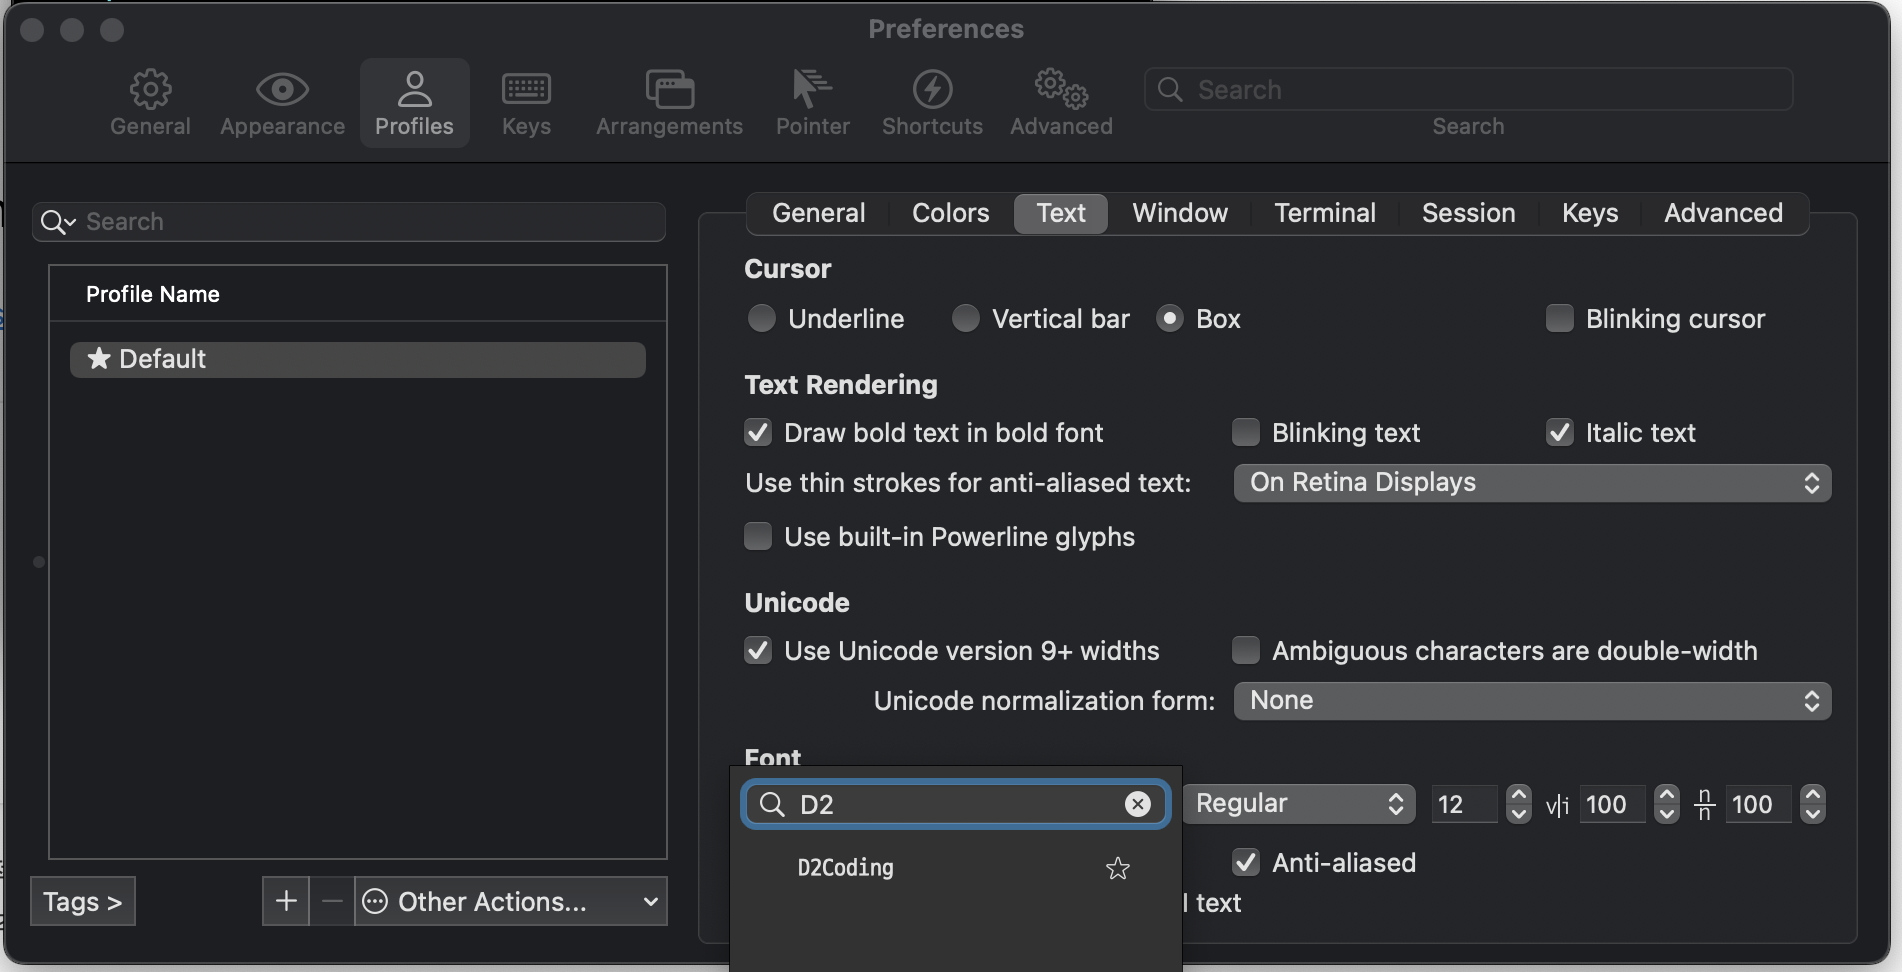
Iterm2 를 띄운 상태에서 상단바의 Iterm2 > Preferences > Profiles > Text > Font 에서 방금 설치한 D2를 선택,
깨짐 현상이 해소된다.
Color 변경
https://iterm2colorschemes.com/
Iterm Themes - Color Schemes and Themes for Iterm2
iterm2colorschemes.com
이거는 취향차이다. 아무거나 선택해도 되는데 나는 Atom 을 선택했다.
해당 주소 상단에 tar.gz / zip 파일을 다운로드 후 압축을 해제하면 종류들이 모두 존재한다.
schemes 폴더에 찜해놓은 Color 의 itermcolors 파일을 설치해주면 된다.
iterm2 > Preferences > Profile > Colors 우측 하단의 프리셋 선택에서 설치한 Color 를 적용한다.

상태바 추가
iterm2 에서 상태바를 추가한다.
Iterm2 > Preferences > Profiles > Session > Status bar enabled 체크
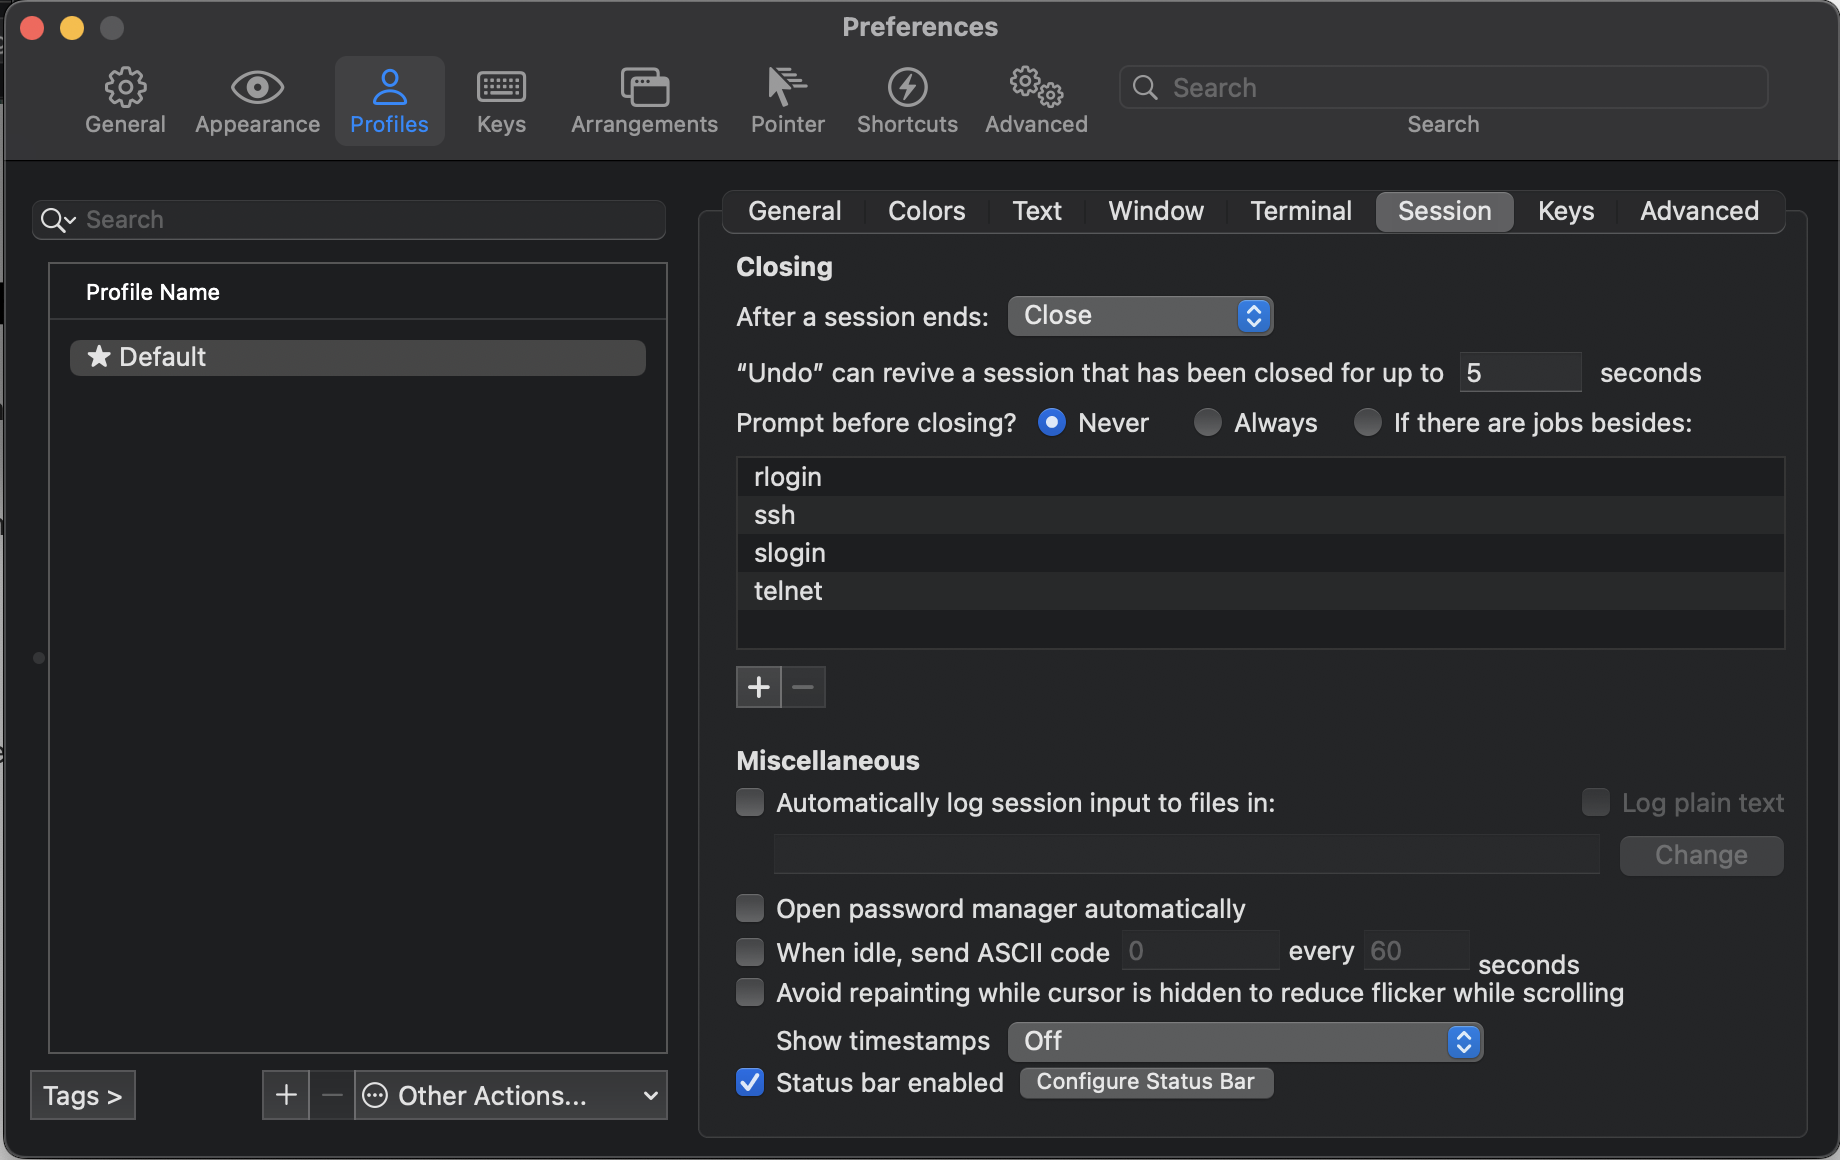
Preferences > Appearance > Status bar location > Bottom 으로 하단에 위치

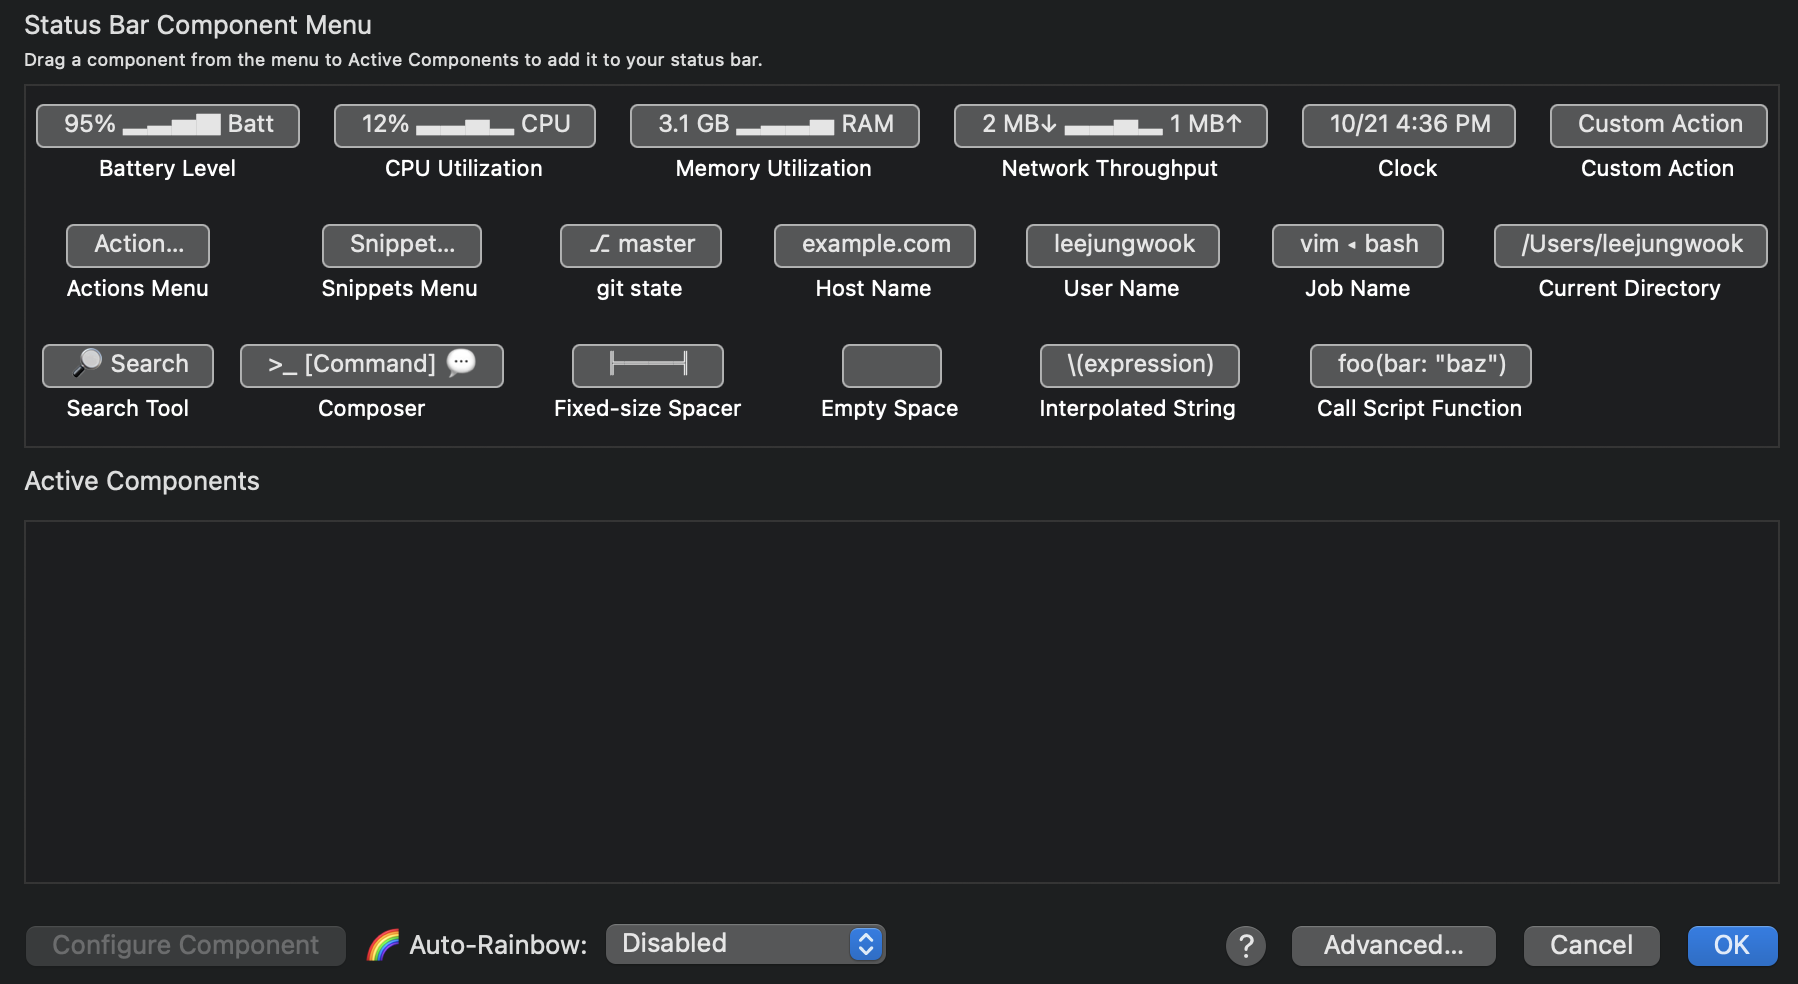
그 후 하단에 Click here to configure status bar 를 클릭해서 원하는 항목을 아래로 드래그해서 설정하면 된다.
(Auto-Rainbow 를 설정하면 색상이 이쁘게 변경된다.)
Plugin 설치 (자동완성, Syntax Highlighter)
git clone https://github.com/zsh-users/zsh-autosuggestions ${ZSH_CUSTOM:-~/.oh-my-zsh/custom}/plugins/zsh-autosuggestions
git clone https://github.com/zsh-users/zsh-syntax-highlighting.git ${ZSH_CUSTOM:-~/.oh-my-zsh/custom}/plugins/zsh-syntax-highlighting
두 플러그인을 clone 한다.
vim ~./zshrc
plugins=(git)

###################

plugins=(git
        zsh-autosuggestions
        zsh-syntax-highlighting)
기존에 git 만 써져있을텐데, 하단과 같이 변경해준다.
tig 설치
git을 사용 중이라면 터미널에서 작업 내용을 확인하고 싶을 수 있다.
최신 버전인 2.5.4 를 아래의 주소에서 다운로드 후 압축해제 해준다.
해제된 경로에서 아래의 명령어 수행
make
make install
make install prefix=/usr/local

brew install tig
이제 git repository 에서 tig 명령어를 입력하면 커밋내역등을 확인할 수 있다.
'DevOps > ✏️ Mac' 카테고리의 다른 글
| 아이폰 탈옥 (palera1n) ios 15+ (54) | 2023.11.15 |
|---|---|
| 아이폰 탈옥 (Altstore, unc0ver) ios 11.0 ~ 14.8 (49) | 2023.11.14 |
| Mac M1 Chip 에서 android emulator 실행 (nox, bluestack) (22) | 2023.10.13 |
| MAC 업데이트 후 xcrun: error: invalid active developer path (/Library/Developer/CommandLineTools) 에러 발생 (0) | 2022.10.29 |
| 초간단 맥북 프로에 java 설치하기! (0) | 2020.02.27 |